Creating Blurred Background Image using ImageMagick
I get it, the title is confusing. Read along and you will understand.
If you are new to the concept of images. An image of size 100x200 means the
image is 100 pixels wide and 200
pixels in height.
Aspect ratio is the ratio
of its width to height. For an image of size 100x200, the aspect ratio is
1:2 or 0.5. It means, for every for every unit of width, the height must be
twice the unit.
Introduction
We want to resize an image of arbitrary size such that
- It matches aspect ratio
x:y. - The aspect ratio of the original image is also respected.
Okay, say you have an image of size 320x428 and you want to resize it to
600x300.

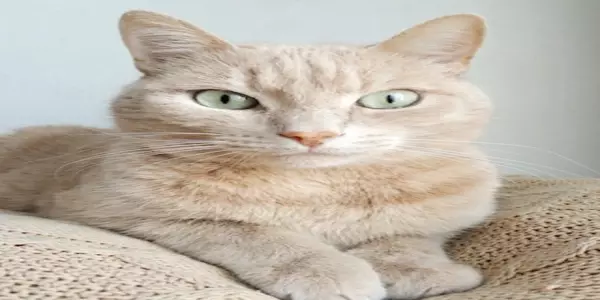
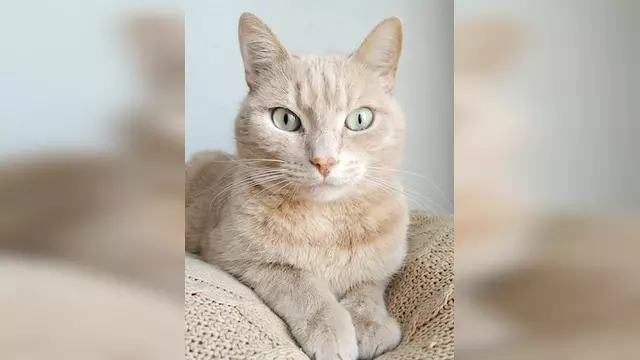
Photo by Alena Koval: https://www.pexels.com/photo/orange-tabby-cat-on-brown-knitted-textile-982300/ See how the cat is concerned about its size!
You can do a brute force style of resizing the image. But.
Oh no, the cat lost his cool
As you can see, the forced resize gives off ugly results. And depending upon the nature of the image, it can even become disastrous. Like, you don’t want to do a forced resize of a map or plot!
The Need
Now you might ask — why do resize at all?! Because the world expects you to 🤷. For me, it was my website. If you go to the homepage, you will see how the article and library cards are arranged neatly.
It is because I have blurred their background and resized them to a fixed
dimension of 640x360. If I didn’t do the resize,
- The cards will be of different size each.
- There will be an ugly empty space around images that don’t fit the card’s size.
As an example, see the below image. There are white spaces around my cat’s image.
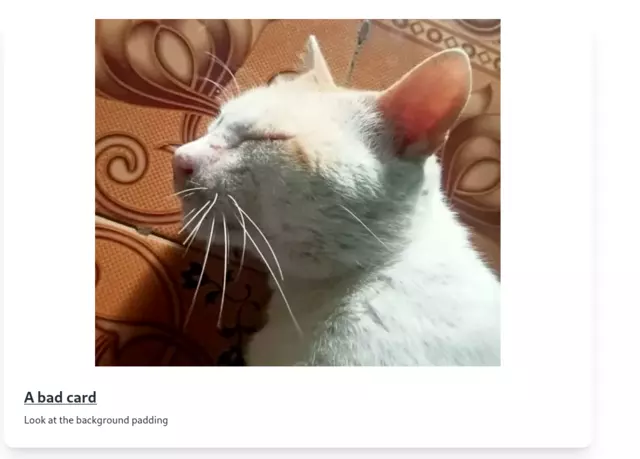
For a website like mine, images come from various sources and they all have a different aspect ratio and size. So doing a forceful resize without preserving the original image’s aspect ratio is not good.
Just Crop?
Yes, you can simply chop of the segments and shape your image to the size you like. But the problem with cropping is that it works only when your image’s size is greater than the expected size.
You can enlarge the image but it leads to broken images. (Just try zooming a very small image, and you will see how the pixels start breaking with every zoom).
And obviously, cropping leads to the loss of data.
Blurred Background Image
Let me restate our objectives. We want to resize an image of arbitrary size such that
- It matches aspect ratio
x:y. - The aspect ratio of the original image is also respected.
The solution I use is like this
- Forcefully resize the image to the desired size, call it
A. - Blur
Aenough to cover the broken pixels. - Do a ratio-preserving resize of the original image, call it
B. - Put
BoverAand call itC. Cis the resultant image.
You might have a question now — what is ratio-preserving resize?
Say you have an image of size WxH and your target image must be of size PxQ. A
ratio-preserving resize scales the original image such that its size is less
that PxQ. That is, the resized image of size MxN will satisfy M <= P AND N <= Q AND M/N == W/H.
Taking back our cat example, the original image is of size 320x428. If we do
the ratio-preserving resize to 600x300, then it becomes 224x300.
>>> 320/428
0.7476635514018691
>>> 224/300
0.7466666666666667
Both of their ratio is approximately equal to 0.74. Also see how our new image
fits within the 600x300 requirement.
We can impose this image on the force-resized-and-blurred image. That’s it, we get a clean image of desired size.
Why Blur?
Instead of blurring, you might want to use a solid color like white, black or even transparency. The issue with the constant colors is that they are not adaptive. For example, my site has both light theme and dark theme. Depending upon your device settings, it chooses the color theme. Now, if I used a solid color of white, then users of dark theme will find it ugly. Similarly, users of light theme will find the black color background ugly.
Transparency is not even option because it takes us back to original problem of space around the image!
But blurring an image means the background is filled with the colors of the original image. If your image has a pink background, then the target image is also filled with pink background.
Blurred background images are not anything new. They have been there for a longtime. There are websites that lets you do it. There is a 110% chance that your favorite image editor already has a way to do it with less number of steps.
If the idea is still unclear, then have a look at this Graphic Design question - Is there an automatic way to resize images to a specific dimension. (blur background and not crop image).
Automating It Using ImageMagick
Actually, the main aim of the article is to tell you how to create the blurred background using ImageMagick.
If you don’t know what ImageMagick is, then quoting from their website;
ImageMagick® is a free, open-source software suite, used for editing and manipulating digital images. It can be used to create, edit, compose, or convert bitmap images, and supports a wide range of file formats, including JPEG, PNG, GIF, TIFF, and PDF.
But why ImageMagick? Because;
One of the key features of ImageMagick is its support for scripting and automation. This allows users to create complex image manipulation pipelines that can be run automatically, without the need for manual intervention.This can be especially useful for tasks that require the processing of large numbers of images, or for tasks that need to be performed on a regular basis.
If you go through the website, you will realize how ImageMagick is one of the best software that has been ever written.
The commands I used here are for ImageMagick 7. They should work fine with
version 6 though. Depending upon your installation and version, the executable
could be either convert or magick
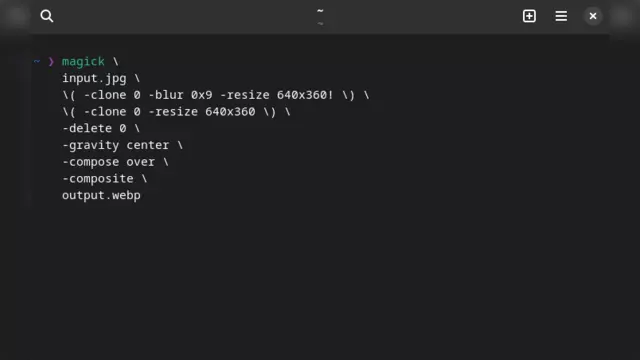
The Command
magick input.jpg \( -clone 0 -blur 0x9 -resize 640x360! \) \( -clone 0 -resize 640x360 \) -delete 0 -gravity center -compose over -composite output.webp
That is a pretty long command, but once you know the basics, it is very easy to
understand. On an overview, we can say ImageMagick takes an image input.jpg,
does some magic and saves the result as output.webp. You can replace
input.jpg and output.webp with your image names.
Let’s break down the command now!
Image Sequence and Parenthesis
The best explanation I have read is from ImageMagick documentation itself. Check it out, however I will try my best too.
ImageMagick works on a list of images. It means, to it, you give a list of
images, ask it to operate on them and save the result. The images can be
referenced by their position which starts from 0.
Now the parentheses ( ) is used to perform a set of operations and append the
result to the end of images list. It is a very powerful feature, because it
allows you to create a pipeline only for a specific set of images. In other
words, it saves you from creating temporary images and then merge them together.
With this in mind, our command can be imagined to be like,
[input]--+-BLUR-+--[input, blurred]--+-RATIO_RESIZE-+--[input, blurred, resized]--...

...--+-DELETE_0-+--[blurred, resize]--+-COMPOSITE-+--[output]
Blurring
\( -clone 0 -blur 0x9 -resize 640x360! \)
This command blurs the input image (which is at index 0). But to be precise,
it doesn’t blur the input image but blurs a clone of the input image. It
clones the image on index 0, blurs it and the resizes it to 640x360. The
exclamation symbol ! is to do a forced resize.
The 0x9 is radius (0) and sigma (9) of the blur. More details can be found
in blur’s manual page.
Similarly, see resize’s manual
page and
clone’s manual page.
Ratio-Preserving Resize
\( -clone 0 -resize 640x360 \)
Similar to blurring, we create a copy of the input and resize it to 640x360.
Note how there is no ! symbol at the end. It means we are doing a
ratio-preserving resize.
Delete Input
-delete 0
delete
removes the image from the images list. (See the pipeline overview above). But,
remember, it doesn’t delete the file in anyway.
We are deleting the input, because we don’t want it to be a part of the merge. Our merge should happen between the blurred and resized image.
Gravity
-gravity center
The blurred and resized images are of different sizes. We should now merge them.
But the resized image should be at the center of the blurred background.
gravity
does that by moving the images to center.
Compose
-compose over -composite
The merge process is called compose.
There are a lot of ways to add two images together. Like you can add their
colors or subtract them etc. We want the resized image to placed over the
blurred image. This is done using
compose
over.
Finally, we perform the composition using
composite.
The resulting image is saved as output.webp.
Conclusion
Applying the command to our cat image, we get,
The cat is happy now!
Creating such images are not rocket science, but having a handy command that works offline and lets you do a rich set of operations is excellent.
Hope you enjoyed the reading!